
Welcome to the vibrant and flavorful journey of crafting an Orange Cake Roll. This delightful dessert is not just a treat for your palate but a joyful experience in every bite. In this comprehensive guide, we’ll delve into the intricacies of mastering the Orange Cake Roll Recipe, providing you with insights, tips, and a dash of citrus inspiration.
The Zesty Beginning
Orange Cake Roll Recipe Unveiled
To kick off your culinary adventure, let’s delve into the intricacies of the Orange Cake Roll Recipe. Begin by gathering the freshest ingredients, including vibrant oranges, to infuse your roll with a burst of citrusy goodness. The process is as delightful as the result, promising a treat that’s as visually appealing as it is delicious.
Citrus Symphony
Selecting the Perfect Oranges
The key to an exceptional Orange Cake Roll lies in the choice of oranges. Opt for juicy, ripe oranges; they impart a natural sweetness and tanginess to your dessert. In this section, we’ll explore the art of zesting, adding an extra layer of citrus flavor. LSI Keywords: citrusy oranges, ripe fruit selection.
Zesting Techniques for Enhanced Flavor
Elevate your Orange Cake Roll by mastering the art of zesting. The orange zest adds a concentrated burst of citrus flavor, enhancing the overall taste. Explore different zesting techniques to find the one that suits your culinary style.
Mixing and Baking Mastery
Crafting the Perfect Batter
Achieving the ideal texture for your Orange Cake Roll involves meticulous mixing. Uncover the secrets to a light and fluffy batter that ensures a delightful roll with every slice.
Baking Tips for Success
Navigate the baking process with confidence, learning the precise temperatures and durations needed for a perfectly moist and evenly cooked Orange Cake Roll. Dive into the nuances of oven settings and pan selection for optimal results.
Filling Finesse
Whipping Up the Orange Cream Filling
The heart of your Orange Cake Roll lies in its filling. Delve into the intricacies of creating a luscious orange cream filling that complements the lightness of the cake, leaving a lasting impression on your taste buds.
Rolling Techniques for a Picture-Perfect Finish
Achieve a flawless roll with expert rolling techniques. Whether you’re a novice or a seasoned baker, these tips guarantee a visually stunning Orange Cake Roll that’s sure to impress.
Orange Cake Roll Recipe Spotlight
A Closer Look at Orange Cake Roll Recipe
Dive deep into the Orange Cake Roll Recipe, exploring its origins, variations, and the creativity it allows. Uncover the endless possibilities this versatile dessert offers, making it a perfect addition to any occasion.
FAQs: Unraveling Queries
How can I prevent my Orange Cake Roll from cracking during the rolling process?
To avoid cracking, ensure your cake is not overbaked. Roll the cake while it’s still warm, using a kitchen towel for support.
Can I substitute navel oranges for Valencia oranges in the recipe?
Yes, you can substitute navel oranges for Valencia oranges, but keep in mind that navel oranges are sweeter, which may slightly alter the flavor profile.
Is it necessary to sift the dry ingredients for the batter?
Sifting the dry ingredients ensures a smoother batter, eliminating lumps and contributing to the overall lightness of the Orange Cake Roll.
How do I store leftovers of the Orange Cake Roll?
Wrap the leftover Orange Cake Roll in plastic wrap and refrigerate. Consume within 2-3 days for the best taste and texture.
Can I freeze the Orange Cake Roll for later consumption?
Yes, you can freeze the Orange Cake Roll. Ensure it’s tightly wrapped to prevent freezer burn, and thaw in the refrigerator before serving.
What other fruits can be incorporated into the Orange Cake Roll for a twist?
Experiment with berries like raspberries or blueberries to add a burst of color and a hint of tartness to your Orange Cake Roll.
The Finale: Savoring the Citrus Magic
Concluding the Orange Cake Roll Experience
As you savor the last bite of your Orange Cake Roll, relish in the joy of creating a masterpiece. The delightful citrus notes linger, leaving you with the satisfaction of a successful baking endeavor.

Orange Cake Roll Recipe
Ingredients
- 6-8 orange slices
- 38 g granulated sugar
- 55 g water
- 5 eggs about 55g each
- 56 g fresh orange juice
- 42 g vegetable oil
- 66 g cake flour
- 52 g granulated sugar for the egg white
- 1 tbsp lemon juice
- 1 tbsp vanilla extract
Filling:
- 160 g heavy cream
- 25 g granulated sugar
- 1 tbsp vanilla extract
- 1.5 g salt
Instructions
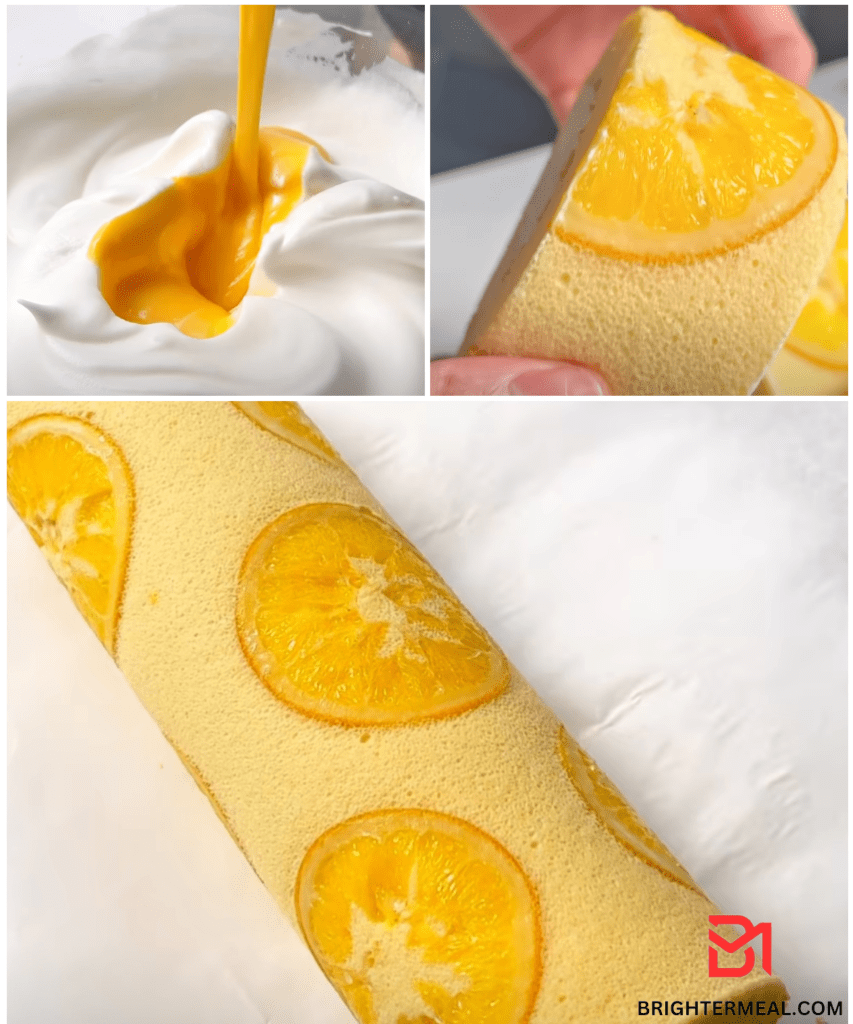
- In a pot, bring together fresh orange slices, sugar and water. Heat until boil, let cook over medium-low heat until only a few water left. Transfer the orange slices onto the parchment paper and dry them with kitchen paper.
- Line the baking tray with baking mat or parchment paper. Randomly place in the orange slices.
- In a clean bowl, mix well fresh orange juice, vegetable oil, cake flour, and egg yolks. Set aside.
- Preheat the oven to 150℃(302℉).
- Add lemon juice, sugar and vanilla extract into the egg white. Use a hand mixer to beat until soft peaks form.
- Pour all the batter into the whipped egg white and gently fold it in until just combined. Gently pour all the batter into the baking tray. Smooth it out. Give it some taps. Send into the oven and let bake for 32 minutes.
- In a clean bowl, bring together heavy cream, sugar, salt and vanilla extract, use a hand mixer to beat until thickened and stiff peaks form.
- Take the cake out of the oven and let the cake cool down on the cooling rack before take it out of the cake pan. When the cake is cool to touch, release the sides of the cake with an icing spatula, turn the whole cake pan upside down on the parchment paper. Take off the pan, and
- peel off the baking mat.
- Spread the whipped cream onto the golden-brown side, smooth it out and roll it up. Let the cake set in the fridge for 15 minutes. Slice and serve.

